Oh the dreaded bathroom. The room homeowners despise to clean and appreciate your work in there more than ever! The bathroom is unique with sticky dust, water and everything else! We break it down into 3 easy trips to get you in, out and leave a Sparkling bathroom behind.
Getting Started
Before you start the bathroom, you need to make sure you are set up for success. Follow the steps below for Getting Started:
Place your tote on the floor.
Stock your Apron:
Apron-***tighten bottles***
Left side: Right side:
Glass/Disinfect Soap Scum
Glass Towel Microfiber Towels (5)
Garbage Cell Phone Magic Eraser/Dobie
You might need your tile brush, large scrub brush, or plastic scraper for some bathrooms. This should already be in your apron.
Let's Get to Cleaning!
Prep
Towels and rugs
Using your cleaning cloth wipe down the towel rack
Tri-fold the towels
Pick up and shake out all rugs & place outside of bathroom.
Dusting
Vanity Light Fixtures and vents
Remove any cobwebs in corners or around light fixtures with your duster
Vacuum/dust vents as needed
Doors and Doorframes
Wipe the ledges and hinges as needed
Remove finger prints and grim as needed from the door edges, especially around the door handles
Wipe door handles
Pro Tip: Doors with inserts tend to get dusty or grimy in the bathroom. Be sure to pay attention to these surfaces and clean them as needed. This is a quick job that can make a big difference.
Windows
Dust/wipe sills and lock ledges.
If there are blinds, turn them flat & dust with your duster
Clean sill.
Mirrors
Dust off the mirror including edges and ledges.
Plants & Pictures
Dust plants with your duster
If there are pictures or art work, hold the bottom with one hand & dust with your other hand
Mirrors and Glass
Mirrors
Spray the glass cleaner/disinfectant onto a glass towel and clean top to bottom, left to right
Pro Tip: Use a very dry cloth and wipe completely dry to avoid streaks. Don’t overspray.
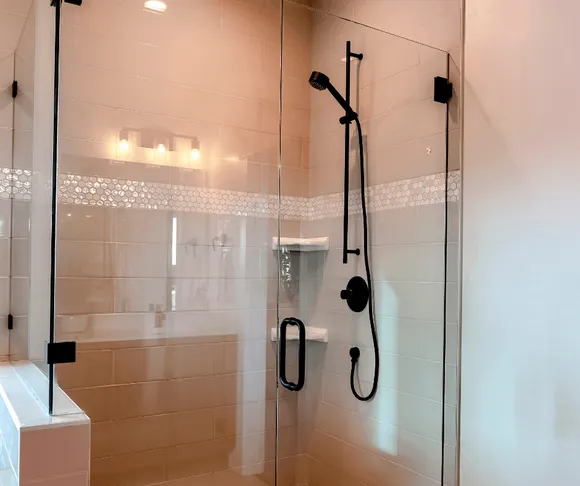
Enclosures/Shower Doors
Spray with disinfectant or soap scum remover (usually disinfectant is sufficient for the top half and soap scum works better for the bottom half) Note: The above should be sufficient for most homes, however, at times you may need to use your Bar Keeper's friend
Using your dobie or cleaning cloth scrub the inside of the shower doors.
Work in a circular motion from top to bottom.
Use the “see through” method to know when the area is clean
Use your plastic scraper as needed
Move the doors to reach inside to clean them.
Note: If doors overlap, spray cleaner on your glass towel and wrap around your scraper and slide into the gap. Use a dry cloth for a final wipe.
Spray the tracks lightly with general cleaner or Bar Keepers Friend
Using your tile brush, scraper wrapped with a cloth, or dobie, move back and forth within the track to remove residue.
Pro Tip: See-Through Method: Use hands to feel the surface you are cleaning. Look through the grime you’ve worked loose determine if the surface is clean. Soap scum feels different than a clean surface.
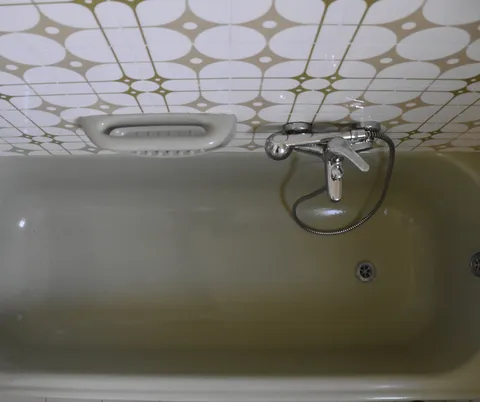
Shower Walls & Tub
Set any items that are on the edge of the tub on the floor outside of the tub. Pro Tip: Take a quick picture with your phone Or set items outside the tub exactly as they were. It's VERY important to put everything back exactly the way it was!
Spray soap scum cleaner or general cleaner on the wall opposite the drain.
Wet your towel/dobie and spread the cleaner around-use microfiber cloth to dry and polish walls.
*Pro Tip-start in top left of shower and work your way around top panel-then move to bottom panel and repeat action.
Continue around the shower, applying cleaner and spreading it with your towel/dobie.
Using your magic eraser or tile brush in hard to reach spaces
Note: Only clean what is dirty. Some homes have bathrooms with unused showers. The higher part of the shower, doesn’t normally get wet and doesn’t need cleaned very often.
When you come to the soap dish or shelf:
Scrape out the soap with the handle of your tile brush or dobie, removing the remaining residue with the bristle end. Then use your magic eraser or dobie to remove the loosened residue
Clean fixtures as you come to them, using your tile brush or dobie.
Wet the bottom of the shower/tub using rinse cup.
Apply soap scum cleaner or general cleaner. Use only what you need.
Starting away from the drain, use your big brush, dobie, or magic eraser and scrub the bottom.
Pay close attention to the corners and use your tile brush or magic eraser as needed to remove residue.
Place your tile brush back in your apron and your dobie in the sink.
Wipe dry walls & floor/tub
Wipe and Replace all items- be sure to put them back exactly how they were.
Dry/Shine fixtures.
Note: When cleaning the shower/tub on your maintenance cleans your soap scum cleaner or general cleaner should suffice, however, in some homes you may need to use Bar Keeper's Friend. Remember, that if you have grime that is not coming off, use a stronger cleaner or tool.
Countertop
Spray general cleaner on your cleaning cloth and wipe down the countertop
Work Back to Front
Wipe down backsplash
Move items forward just enough to clean behind and underneath them
Wipe down items on counter
Move them back into place (remember keep items in the same order you found them)
Finish cleaning the counter
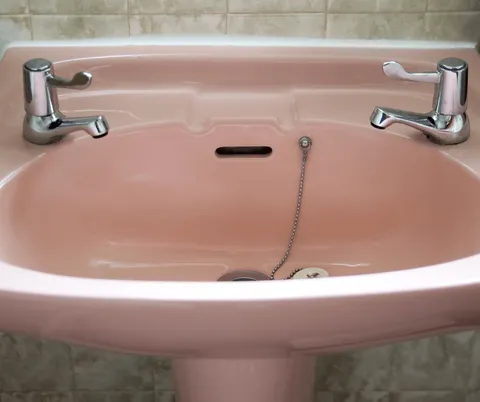
Sink
Wet your dobie with water and wipe down entire vanity-moving hair and dust onto floor or into sink.
Spray dobie or cleaning cloth with general cleaner
Using the dobie (still full of cleaner from the tub), or your magic eraser & clean the sink.
Rinse the dobie and the inside of the sink.
Apply cleaner to your cloth and wipe the faucets and the outside area of the sink.
Spray faucets/drain once with Bar Keepers and use the tile brush to scrub around the base of the faucets/drain
Use your dobie or cloth and wipe the rest of the outside of the sink.
Dry and shine the chrome fixtures
Wipe entire area (including interior of sink) with cleaning cloth to dry
Put the dobie in a lined pocket of your apron.
Bathroom Vanity
Only clean what is dirty. Remember vertical surfaces tend to be cleaner than horizontal surfaces.
Spray general cleaner on your cleaning cloth, wipe the tops of the drawer or cabinet.
Wipe the face of the cabinets as needed
Remove finger prints and grim from around handles.
Toilet
Inside
Note: This step is completed in the Pre-flight if the client uses disposable toilet brushes.
Clients are required to provide a toilet brush in every bathroom. Advise the office during your pre-flight if there is not a toilet brush available.
Apply baking soda & dawn to the inside the toilet, making sure it is applied along the sides of the bowl. Add vinegar to the bowl and allow the cleaners to do some work.
Wet the toilet brush by dipping it into the bowl
Starting high on the inside upper rim, move the brush in a circular motion working your way around and down the bowl. Clean as deep into the bowl as you are able. Be sure to get under the rim!
Shake off additional water from the brush and return it to it’s holder
*Pro Tip-use your pumice stone for hard to remove staining/pink rings
Flush the toilet
Outside
Start at the top of the tank and work down. Use your general cleaner
Put both lid and seat into the “down” position
Wipe down the top of the tank, cleaning the toilet tank and handle as you go.
Wipe the top of the toilet lid
Wipe the flat area and clips behind the seat as needed to catch overspray
Wipe the bottom & top of each lid, lifting the seat/lid as you complete each. Apply additional general cleaner as needed
Wipe the rim of the bowl
Flush toilet and make sure no debris left behind.
Close the seat & the lid.
Fold your cleaning cloth to a clean side & apply general cleaner
Work downwards cleaning the outside of the entire toilet bowl
Wipe around the base of the toilet and the bolt caps and gaskets.
Pro Tip-Use your scraper and a towel to get around the bolts or clips-save your fingers
Wipe the area again around the back of the seat & the hinges
Sit on the toilet with the lid closed
Look around- did you miss anything? Toilet towel is then done for the day. It should NOT be used in any other spaces.
Making the Perfect Toilet Paper Triangle
Lift out one paper sheet above the roll.
Fold the right corner down to the left edge. Use the edge of the toilet paper for alignment.
Fold the left corner to the right corner of the toilet paper.
Layer the toilet paper down so the triangle sits neatly.
The Floor
Vacuuming
Place your cleaning tote outside of the bathroom.
Start vacuuming at the back of bathroom
Vacuum your way out of the bathroom using your wand as needed
Handwashing Floors
Starting in the far corner working your way towards the door, spray general cleaner onto the floor. Using your towel folded into fourths, start wiping clean the floor. As your towel gets dirty, refold to a clean side. Once all clean sides are used, put it in your plastic bag on the door and get out a clean towel from your apron. Be sure to get the baseboards as well!
Once the floor is dry:
Replace rugs -Make sure the tag is not sticking out
Straighten shower curtain--plastic shower curtain should be on the interior of the shower-decorative curtain on the exterior of the shower
*Pro Tip-shake out plastic curtain outside of tub prior to vacuuming and placing back into shower
Vacuum rugs--Not all rugs can be vacuumed!
Stand on one end of the rug to keep it in place
Vacuum away from where you are standing
Lift up the floor nozzle after every stroke and start again to the right
Stand on the opposite end of the rug and repeat steps 1-3
Helpful Hints
Spare Bathrooms are not often used, apply the rule, “if it’s not dirty, don’t clean it”
Wipe down shower/tub with a damp cloth
Don’t automatically clean mirrors if they are not dirty
When cloths get soiled or too wet, put them in a lined pocket of your apron, or in your dirty towel bag in your tote. Do NOT leave cleaning clothes on the floor or countertops.
When moving items, move them the shortest distance possible-unless high probability of breakage
Keep items in the same order they were inside the tub and on the counter. Clients do not like their items re-arranged. By keeping items in the same order you can ensure they go back as they should.
If there is a bar of soap, place soft side up on a folded cleaning cloth or edge of the tub.
Test Your Knowledge
Click the button below to test your knowledge of the PMC system, cleaning tools and cleaners. If you score at least 80% move onto Dusting. If you score less than 80%, go back and review the content again, working with your trainer to answer any questions you may have. Good luck!